Make Your Own DIY Native American Drum
Jul 2nd 2021
 Music plays a key role in Native American life. Decorated with color and design, drums serve an essential part of the ceremonies performed by Native Americans. Percussion instruments were traditionally made from materials that tribes took directly from the land. You can try making your own Native American drum, but you may want to use some modern-day tools and supplies. Whenever you can, gather your building materials from the natural world around you and, as you do, reflect on the connection native people have with the land on which they live.
Check your toolbox for the following:
- a drill along with bits of 1/8-inch and 1/4-inch
- a heavy-duty pair of shears or tin snips
- sandpaper
- an awl
If you don't have a heat gun, grab your hairdryer. Your building materials can be purchased at a variety of craft and hobby stores or on-line. Don't forget to check local heritage festivals in your area; they are prime events for buying the materials you need and for meeting master craftsmen who may offer helpful advice. You will need:
- extremely thin plywood (about 1/88-inch thick) four inches wide and four feet in length
- about two square feet of rawhide
- 12 inches of leather lace.
- a six-foot long masonry cord or sinew or similar stout cord
- a length of string
- oil-based paint (if you choose to paint the drum)
Carefully sand the edges of the plywood until they are smooth to the touch. Soak it in water for about 12 hours (or longer) until it becomes pliable. You should be able to bend it without having it split or break. Once it's ready, you're going to make it naturally remain in a bent position by bending it into a circle that's about 14 inches in diameter. Use the hairdryer to heat the wood to help bend it. The edges should overlap quite a bit. Keep this part of the circle overlapping by tying it with string. For 48 hours, set it in a warm, dry location away from the sunlight.
Remove the body of the drum from its resting place. Using the 1/8-inch drill bit, create holes where the wood overlaps. Make two holes at the beginning of the overlap and two near its end. Thread your cordage through these holes three times and then tie the ends on the inside. Square knots are best. Now your drum's shape will be secure. Remove the string you had tied to the drum's body earlier.
Lay the body atop the rawhide. Using a pencil, outline it so that your circle is two inches wider than the body's diameter. Add to the perimeter of your circle four two-inch-long tabs equally spaced apart. Cut this out of the rawhide so that it is in one piece. Place it in a bin of water overnight.
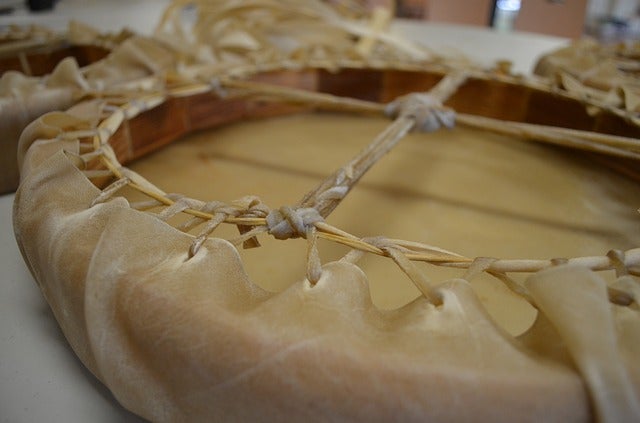
With your remaining rawhide, cut as many 1/4-inch-wide strips as you can. You may or may not use them all. These thongs should be as long as you can make them. Place them in water to soak. You'll want them to be pliable before you use them. Next, poke two holes in each of the rawhide tabs. They should be 1/3 of an inch away from the rawhide's edge. Also do this all along the perimeter of the rawhide so that you create a circle of holes. Feed a thong through a tab's holes. Do the same on the opposing tab. Pull the thong as tight as you can before tying it. Repeat this with the remaining tabs. Now, thread a thong through a hole in your circle of holes. Do this again and then tie a knot. Keep doing this, trying to pull the leather as tightly as possible until you reach the starting point.
Once your drum has dried completely, you will notice that it has shrunken. To achieve a deep, resonating sound, allow your drum to harden before you try playing it. You can also add a handle to your drum with leather lace by drilling two holes in its body. If you desire, paint a design on the head of your drum or on any visible wood. Once it's completely dry, beat it with your hand or a soft drumstick.

